-40%
Wen-Mac Texaco North Dakota Tanker Upgrade Parts: Power Switch Kit
$ 3.69
- Description
- Size Guide
Description
Wen-Mac Texaco Tanker Replacement Parts: POWER SWITCH UPGRADETHIS LISTING IS FOR ONE POWER SWITCH UPGRADE KIT ONLY
Fix up or upgrade your old Wen-Mac Texaco Tanker with these new replacement parts.
Listing is for one Power Switch Upgrade Kit only.
The original Texaco Tanker power switch is an on/off device for the 1.5V motor.
It frequently fails due to its poor design.
You can mount a new switch anywhere to control either the original 1.5V circuit or to be the power switch for the ESC in an R/C conversion. But wouldn't it be nice to have an option that uses the original mounting, and which requires no irreversible mods to any of the other parts?
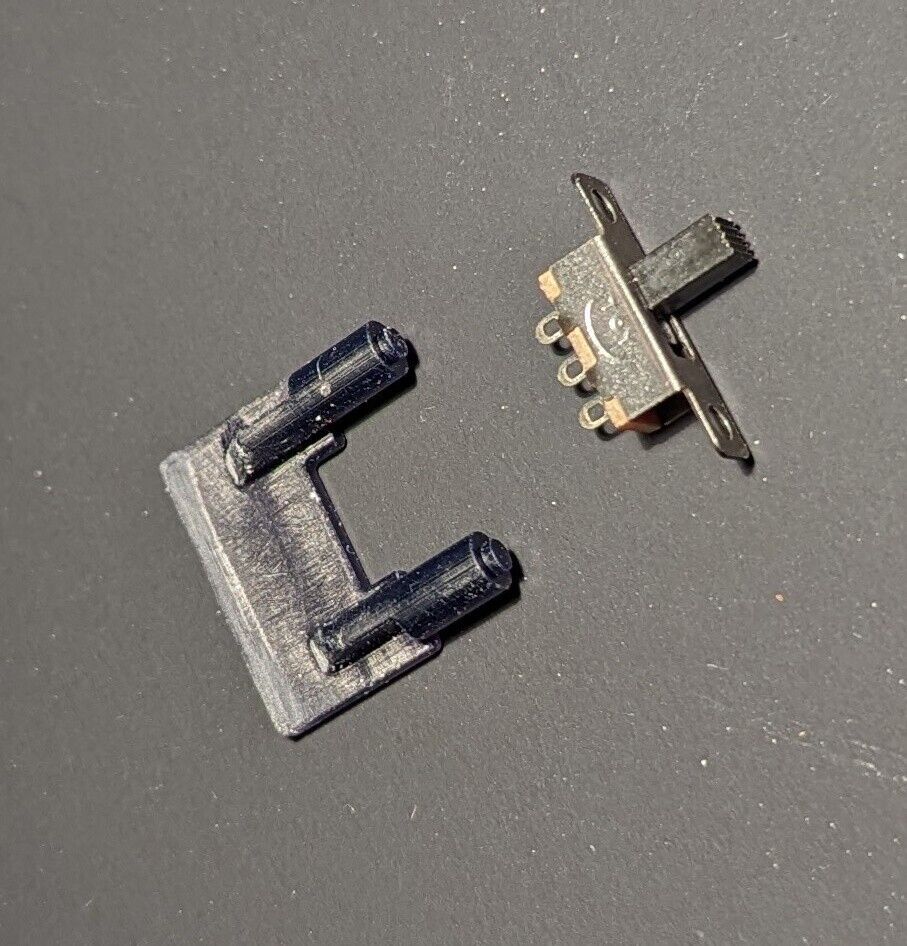
Here you go! This upgrade kit provides a modern slide switch and an adapter to mount it in the correct position using the original mounting pegs.
How to install the Switch Upgrade Kit:
1. Note that wiring is up to you. Soldered joints are strongly recommended! The tabs on the switch are small but will accept the original wire.
2. To avoid modifying the aft house and its upper deck, you will need to modify the switch to narrow its plastic slider. If you are willing to open up the slots in the house and deck, then you can do that instead.
3. Hold the switch in a small vise. Use a file to reduce both flanks of the plastic slider, trying to take the same amount off both sides, until the slider is about 0.070" thick (just over 1/16"). No calipers? Just keep going until it fits the slot in the house! Then clean any dust off the switch.
4. Glue the switch to the adapter. I like to use "tire cement" (rubberized CA) from the hobby shop, along with a drop of accelerator ("kicker") to set the glue. The switch should be sitting nicely on the two pegs at this point. The joint should be solid, but note that once the house is installed, it traps the switch on top of the adapter.
5. Route your wires and push the switch adapter home in the pegs.
6. When installing the house, some wiggling of parts will be needed! Try putting the front end of the house down over the switch, then gently press its aft retaining tab into the slot in the deck. Finally secure the house with a deck screw next to the switch.
Photos show:
1st image: Switch and switch holder- this is your kit.
A. Original lever switch
B. Upgrade with modern slide switch
C. Original switch sitting in its retaining pegs on the poop deck
D. Original switch removed to show the four retaining pegs
E. Upgrade slide switch and holder sitting in the unmodified pegs
Combined Shipping:
IMPORTANT! To obtain combined shipping, do this:
0. Work on a laptop/desk top-- this is not available on the mobile app.
1. Add desired items from my listings to your shopping cart. DO NOT "BUY IT NOW"!
2. Check that you have selected the desired quantity of each.
3. Go to your shopping cart by clicking the available link, or by clicking the shopping cart icon. DO NOT go to "Checkout" at this time.
4. Near the top of your shopping cart list, click on "
Request combined shipping
".
This will send a notice to me, and I will respond shortly with a payable invoice with the reduced shipping total. Now you can pay, and thanks for your business!
If you don't do this and order multiple items and I'm feeling cranky, I may well send you multiple boxes at the full shipping cost. Feeling lucky? ;-)
Click on "
Seller's Other Items
" to see all my Texaco Tanker parts!
